Track Manager#
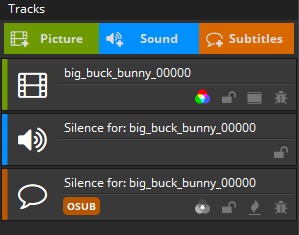
On the left side of the main window you can find the Track Manager. Content, which should be part of a package, must be added to this Track Manager first in form of Tracks.
A Track is the smallest building block of a DCP and represents either
an image sequence
an image still picture (which gets internally multiplied for a given duration)
a sound Track comprised of either a multi-channel audio file or a multiple mono-sound files (or a combination thereof)
or timed text (Open/Closed Subtitles/Captions).
Tracks are just references, “pointing” at the original source files. Do not move or rename the source files after you have imported them. Each Track that is used in at least one Reel will become a single file in the created DCP. Tracks may have a description (i.e. Annotation Text) and a specific encryption key.
Tracks that are not used anywhere will automatically be omitted.
When you have a DCP with many Tracks, it is convenient to search for a Track by title or by type using the bar at the bottom:

Picture Tracks#
Add Picture Track#
To add a picture sequence to the Track Manager, just click the “Picture” button at the top of the Track Manager or simply drag and drop files onto the Track Manager or directly into a Composition. You can also add a picture track using the main menu navigating through Track -> Add Picture Track….
Depending on the amount of image files in the selected directory, both browsing and opening an image file sequence may take some time.
easyDCP Creator will take the selected picture file as the first frame for the Picture Track and will also pick all subsequent images (of this format) in the same folder which belong to the sequence. If the fifth picture file (e.g. big_buck_bunny_00004.j2c) of this image sequence is selected, the imported Picture Track will start at this fifth picture and the first four pictures will be ignored.
According to the DCI standards, the duration of a DCP has to be at least one second. The amount of frames varies, depending on the current project’s frame rate (e.g. 24 frames for 24 fps). If you open an image file sequence with duration less than one second, an error will be shown for the reel and before generation.
Furthermore, each picture in a sequence is required to have the same resolution.
Add Stereoscopic Picture Track#
To add a Stereoscopic Picture Track select “Track -> Add Stereoscopic Picture Track…” in the main menu. The following dialog will open:
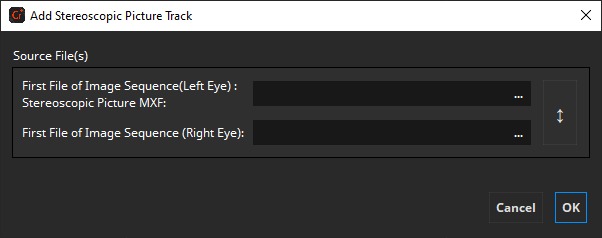
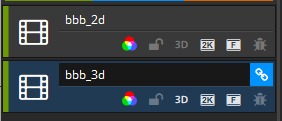
To add a stereoscopic picture Track to the Track Manager, just choose separate file sequences for each eye, i.e. one file sequence for the left eye and one file sequence for the right eye. Both file sequences are required to have the same number of files, resolution and format. Usually, these file sequences should be in different folders. If you want to load a stereoscopic MXF file, load it in the left-eye-field and leave the one for the right eye empty. If a Picture Track is stereoscopic is signaled by the 3D indicator of the Picture Track.
Numbering of input image file sequences#
To represent an image sequence, the image files shall be numbered with or without leading zeroes (see Examples 1 and 2). Additionally, the prefix may also contain digits (see Example 3).
- Example 1 (with leading zeroes)
Img_0000001.DPX
Img_0000002.DPX
Img_0000003.DPX
Img_0000004.DPX
…
- Example 2 (without leading zeroes)
Pic_998.J2C
Pic_999.J2C
Pic_1000.J2C
Pic_1001.J2C
…
- Example 3 (with numbers in filename)
Pic2001_998.TIF
Pic2001_999.TIF
Pic2001_1000.TIF
Pic2001_1001.TIF
…
Add Still Picture Track#
A Still Picture Track is a convenient way to show small local advertisements.
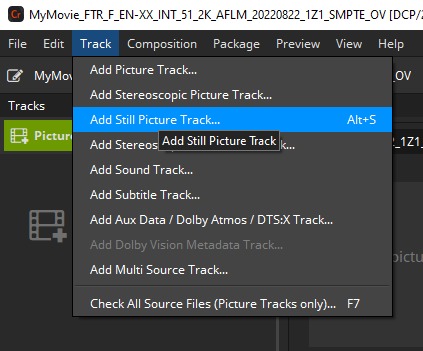
To add a Still Picture Track or Stereoscopic Still Picture Track to the Track Manager, select either “Track -> Add Still Picture Track…” or “Track -> Add Stereoscopic Still Picture Track…” in the main menu.
The following dialog will appear. For the stereoscopic case a similar dialog will appear with an additional input for the right eye still image.
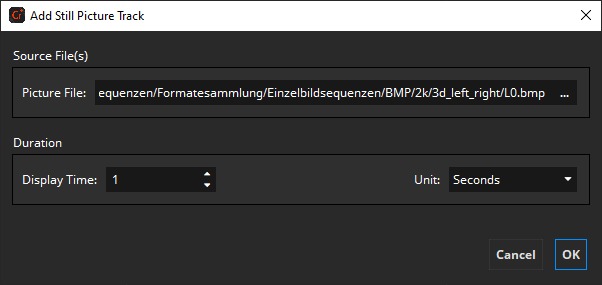
Now you can choose a picture file and a display time in seconds that defines how long the picture will be displayed on screen.
After pressing „OK“, the still picture will be added to the Track Manager. The frame count of the still picture will be calculated automatically, depending on the current project’s frame rate.
Supported Image File Resolutions#
A DCP typically has one of three aspect ratios:
Aspect Ratio |
2K |
4K |
|---|---|---|
Full Container |
2048 x 1080 |
4096 x 2160 |
Scope (2.39:1) |
2048 x 858 |
4096 x 1716 |
Flat (1.85:1) |
1998 x 1080 |
3996 x 2160 |
In theory, other resolutions are valid as well. The DCI specifications state that at least one side must fill out the full container. However, for best interoperability you are recommended to stick to one of the above aspect ratios.
If your input images do not already have any of the above resolutions, they can be scaled and/or black bars can be added at the sides. The next chapter describes the various options in more detail.
2K/4K Container Resolution#
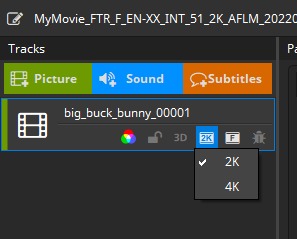
The Container Resolution property defines the full container resolution of the Picture Track that is used as target for Letterboxing & Scaling. To create a 2K DCP the Container Resolution must be set to 2K for all Picture Tracks used in the DCP.
The Container Resolution of all Picture Tracks in a Composition must be set to the same Container Resolution. A DCP can be composed of multiple Compositions with different Container Resolutions (2K/4K)
When adding a Picture Track, easyDCP Creator will automatically preselect 2K for all sources with a resolution smaller or equal 2K. For sources with greater resolutions 4K will be preselected.
The Container Resolution can be changed via the property menu. Changing the Container Resolution may also be required to create a 2K DCP from a 4K source or vice versa.
Letterboxing & Scaling#
Pillarboxing is the process of adding black bars (“pillars”) at the left and right sides.
Letterboxing is the process of adding black bars on the top and bottom.
By default, all input images will be pillar- or letterboxed to Flat, Scope or Full container, whichever is the closest match.
Example: f the source material were in HD (1920x1080), narrow black bars (each 39 pixels wide) would then be added to the left and right so that the DCP’s aspect ratio becomes “Flat” (1998x1080).
This ensures that all sequences within a multi-Reel Composition will have identical resolutions and that the Composition has a DCI-compliant aspect ratio that will playback as expected on a D-cinema server. Many servers only have presets for “Flat”, “Scope” and “Full”. Selecting the correct preset is often required in order for the timed text to be properly positioned and for the curtains to be aligned exactly at the image’s left and right edges.
Of course you may manually override the automatic mode and pick any other strategy.
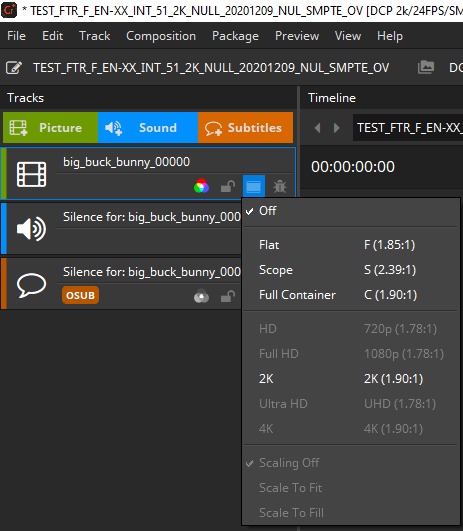
If scaling is set to Scaling Off, no scaling will be applied.
Scale To Fit will scale the image so that it completely fits the target resolution, but without any cropping. Black bars will probably have to be added to reach the target resolution. The aspect ratio of the input image will not be changed.
Scale To Fill will scale the image until the target resolution is reached in both width and height. No black bars will be added. In case the scaled width or height then stretches beyond the target resolution, parts of the input image will then have to get cropped. The aspect ratio of the input image will not be changed.
Regardless which combination of boxing or scaling options is selected, the input image sequences’ native aspect ratio will always be maintained so that images will never get disproportionally distorted.
Color Processing#
In a DCP, all images are required to be in the “XYZ (DCI)” color space with a gamma of 2.6. Since the input material imported into easyDCP Creator is typically not in this color space, but often in RGB, all images have to be color processed. In case the imported image sequences are in the right color space, e.g. when you are importing JPEG2000 codestream files (*.j2c) from an existing DCP, color processing can be bypassed by setting the source color space to “XYZ (DCI)”. This will also have a positive impact on the DCP render performance.
In easyDCP Creator, color processing can be done via selection of
A color transformation XML file preset (*.xml),
A user generated 3D lookup table file (*.3dl) or
Source and destination color spaces XML file presets (*.xml),
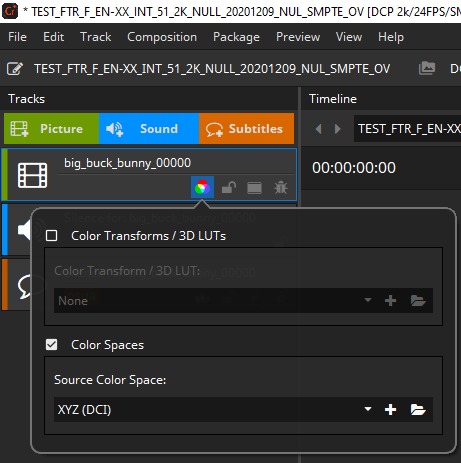
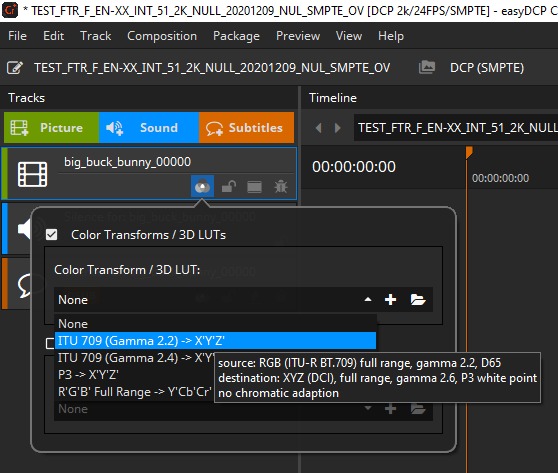
If color processing is activated, you see a small icon on the track. If color transformation is bypassed, the color processing icon is absent.
In easyDCP Creator the color processing is specified individually for each picture Track. To do so, right click on a picture Track and select “Color Processing” or simply click the picture Track’s color space button:
Color Transform Presets
In versions prior to 3.3.2, color transforms were of the form “source space -> target space”. Each transform is represented by a file in the color transform repository. They use a proprietary XML format. The files can be edited and new ones can be added. These types of color transforms are still available for backwards compatibility. In the screenshot above, select the “Color Transforms / 3D LUTs” group box. The repository can be opened by clicking the folder icon. New files or 3D LUTs (*.3dl) can be added with the plus icon.
ITU 709 to XYZ Color Transformation (default)#
Using this chain assures a DCI compliant processing of the input images. easyDCP Creator takes care about the color transformation and JPEG 2000 encoding. EasyDCP Creator expects RGB images with a sRGB/709 color gamut. Use this chain if you don’t want to take care about color spaces and format conversions.
Note: The color transformation from linear RGB to linear XYZ uses the matrix defined in SMPTE RP177 Annex B.3, as sRGB/709 has other primaries and white points than the reference projector.
Input values:

The ranges of values describing the white level and the black level of the ITU 709 standard are not utilized. This means that black is represented by a value of 0 by each component. On the other hand white is represented by the maximum value of the file format.
Example 1: TIFF files with 8 bits => Maximum value = 28 – 1 = 255 ,Range [0..255]
Example 2: DPX files with 10 bits => Maximum value = 210 – 1 = 1023 ,Range [0..1023]
Normalization and Degamma:
Using the given input values easyDCP Creator normalizes the input values and applies a de-gamma of 2.2
Color Transformation:
The ITU 709 color values will be converted to XYZ color space using the primaries shown in the following table.
D65 – ITU 709/sRGB |
X |
Y |
|
|---|---|---|---|
R |
0.6400 |
0.3300 |
|
G |
0.3000 |
0.6000 |
|
B |
0.1500 |
0.0600 |
|
W |
0.3127 |
0.3290 |
Gamma and De-normalization
In this step a fixed gamma of 2.6 will be applied on the normalized XYZ values. Afterwards a de-normalization step will map the bit-range to 12 bit output values which is necessary for the correct JPEG 2000 encoding.
What input data characteristics should the R’G’B’ pixels have?
easyDCP Creator uses full input range, means e.g. for 10 Bit 0..1023 code values (black is 0, white is 1023).
R’G’B’ means a gamma of 2.2 is applied to the linear RGB values.
The color gamut of the RGB values should be sRGB/ITU 709 with D65 white point.
3D Lookup Table (3D LUT)#
3d lookup tables can combine complex image processing steps, hence speeding up image processing.
To choose a 3d lookup table for a specific Picture Track, right-click on the Picture Track and choose “Color Processing -> 3D Lookup Table…”:
To ensure that lookup tables have the correct file format, check the example 3d lookup tables, delivered with this software in the folder „Example Lookup Tables“.
Supported 3D Lookup Table File Formats#
Unfortunately there are no established standards for lookup tables. easyDCP Creator will read the most popular „3dl“ files. The supported file formats are:
ASCII File Format Bit Depth: 1..16 Supporting Points: 2..128
XML file format as well as floating point values are not yet supported.
Bypass Color Processing#
Bypassed color processing is used if the source image files already are in the right color gamut.
To bypass color processing for a specific Picture Track, right-click on the Picture Track and choose “Color Processing -> XYZ”:
Color Transformation has to be bypassed if you want use direct copying of the source image files into the final DCP without re-encoding. For proper metadata you sometimes need to select and identity color transformation by selecting the same source and destination color space.
Export Frames to JPEG 2000 Codestream (J2C) Files#
To export the source image files of a specific Picture Track, right-click on the Picture Track and choose “Export Frames…”:
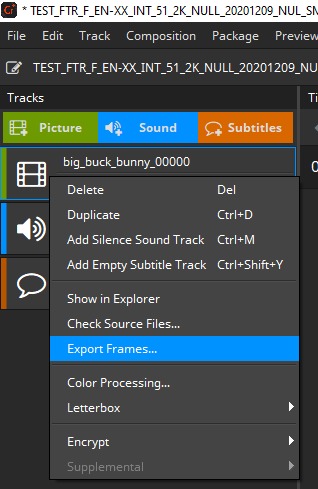
After pressing „Export Frames…“, the easyDCP Standalone JPEG 2000 Transcoder comes up:
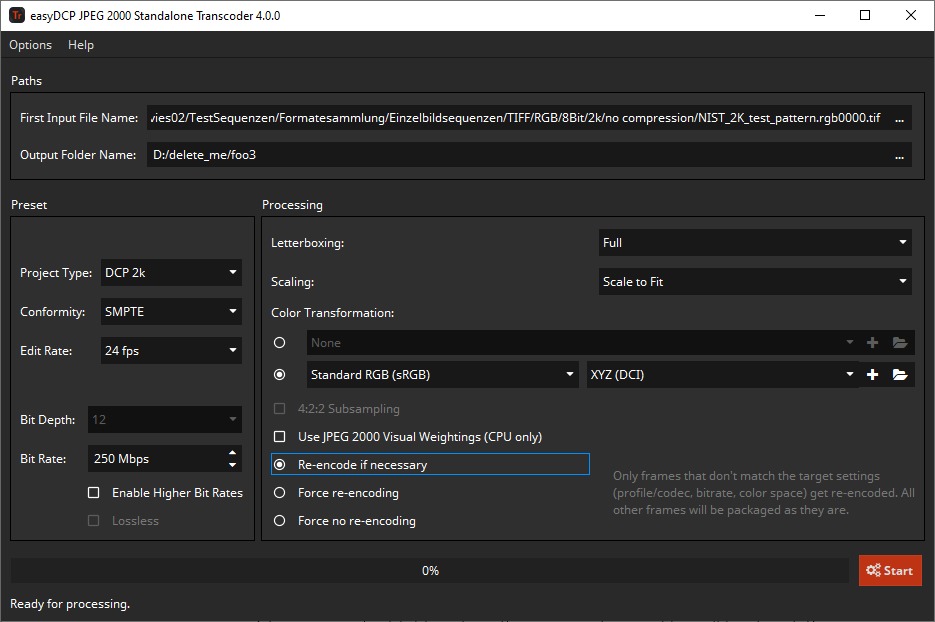
Several settings are obtained from the current easyDCP Creator project (e.g., resolution, stereoscopic or not, InterOp or SMPTE, framerate, color processing, pillar-/letterboxing, scaling, bitrate).
Choose an output folder where the processed image files will be stored. Press Start to start the processing.
Sound Tracks#
The audio format of a DCP is specified to be:
uncompressed
24 bits per sample
Sampling rate of 48 KHz (or 96 KHz)
Up to 16 Channels
easyDCP Creator will automatically convert any supported input (see 5.2.6 Supported Sound File Formats ) to match the specification.
Add Sound Track#
To add sound material to the Track Manager, click the “Sound”-button on the top of the Track Manager or use the main menu “Track -> Add Sound Track…”.
The following dialog will appear where you can load one or more single- or Multi-channel files that will be combined into a sound Track.
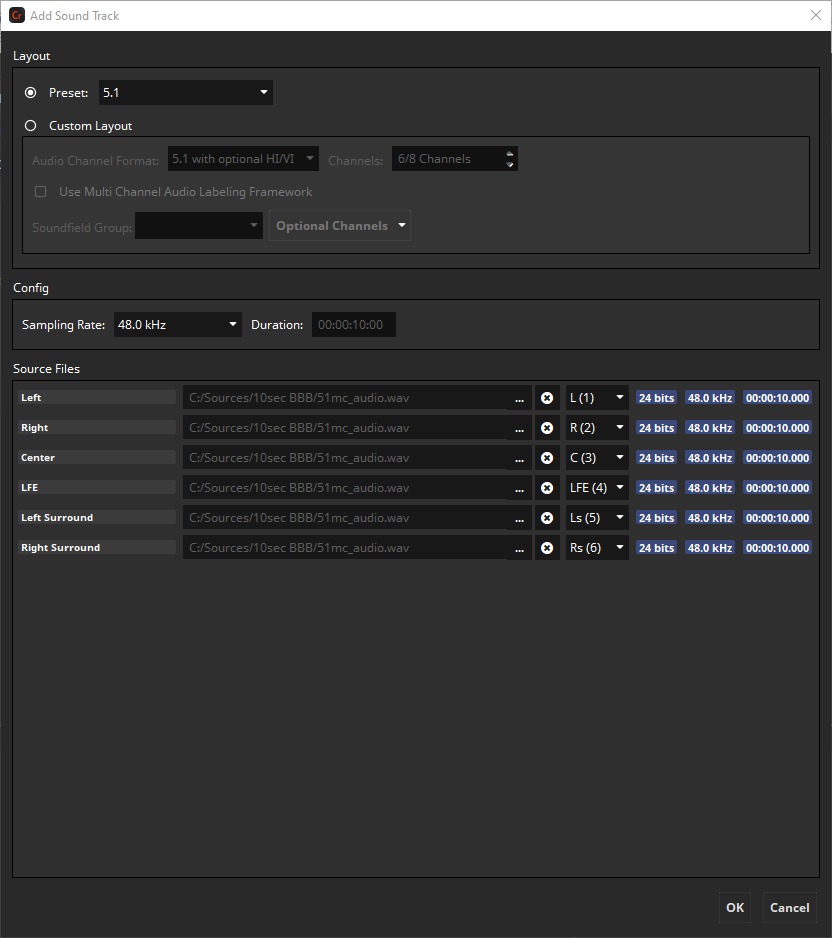
Layout#
The Add Sound Track dialog offers two modes to set the channel layout of the Sound Track.
Preset – In this mode a layout can be chosen from a predefined set of configurations. The values in the custom layout section will be updated according to the selected preset.
Custom Layout – This mode gives more control over the layout configuration. Depending on the variant set in the project configuration it allows to set the Audio Channel Format and channel count or a Multi Channel Audio Framework labeling.
InterOp and SMPTE Audio Channel Format Wild Track Format do not define a channel layout. In this case easyDCP Creator will fall back to and display the default layout defined in ISDCF Document 4 – Audio Channel Assignments.
Config#
The Config section can be used to set additional parameters of the Sound Track that are not part of the channel layout.
Sampling Rate – The target audio sampling rate of the Sound Track in the DCP. Supported options are 48 kHz and 96 kHz.
Sources with different sampling rate will be converted to the selected target sample rate.
Duration – If any source is present, this will display the duration of the Sound Track and edit will not be possible. In case no source is present the duration of the then silent Sound Track can be set.
Source Files#
In the Source Files section one or multiple source files can be added either via drag & drop or a file browse dialog. If a file contains multiple channels, all sources for the following channels will be auto filled. Channels with existing sources will be skipped.
The first column shows the channel layout of the Sound Track as configured in the Layout section. The drop down on the right-hand side shows the detected layout of the source channels and the channel number.
The mapping of the source channels to the layout can be changed by rearranging the channels via drag & drop or by selecting the source channel via the drop-down source channel selector. If easyDCP Creator detects any channel labeling in the source, the channels will be labeled accordingly in the source channel selector.
For each channel with a source file the source metadata will be displayed. This includes sample rate, sampling depth and duration.
Channels with no source set will be filled with silence. A silence Sound Track can be created by leaving all channels empty and setting the desired duration in the Config section.
Multi-Channel Audio Labeling Framework#
With Multi Channel Audio Labeling Framework (MCA) every used (, non-silent) channel is labeled with a specific Audio Channel Label that represents the type of the channel. Multiple channels can be grouped together by a Soundfield Group like 5.1.
Sound Tracks of SMPTE 429 DCPs may be labeled with the MCA Framework. This can be done either by selecting a MCA preset or by using the Custom Layout mode. With SMPTE 429 DCP the use of MCA in easyDCP Creator is currently limited to one Soundfield Group and its associated Audio Channel Labels.
Sound Tracks of RDD 52 DCPs shall be labeled with the MCA Framework. MCA is required and any preset will use MCA. Furthermore MCA cannot be disabled in the Custom Layout mode.
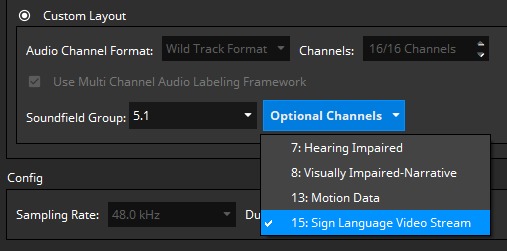
Optional Channels (RDD 52)#
With RDD 52 the following optional special use-case channels exists:
Channel No. |
Use Case |
|---|---|
7 |
Hearing Impaired |
8 |
Visually Imapired-Narrative |
13 |
Motion Data |
15 |
Sign Language Video Stream |
These channels do not belong to the Soundfield Group and have to be explicitly labeled. This can be done by setting the layout mode to Custom Layout and switching the required Audio Channel Label on or off via the Option Channels menu.
Add Sound Track for Dolby Atmos#
In case of RDD 52 the Immersive Audio (Atmos) preset should be used.
If a reel contains a Dolby Atmos track, the Main Sound Track has to provide a sync signal that is automatically generated on channel 14. Select one of the Dolby Atmos presets from the “Add Sound Track” dialog and mark unused channels, plus the actual sync channel 14, as silent by leaving their field empty:
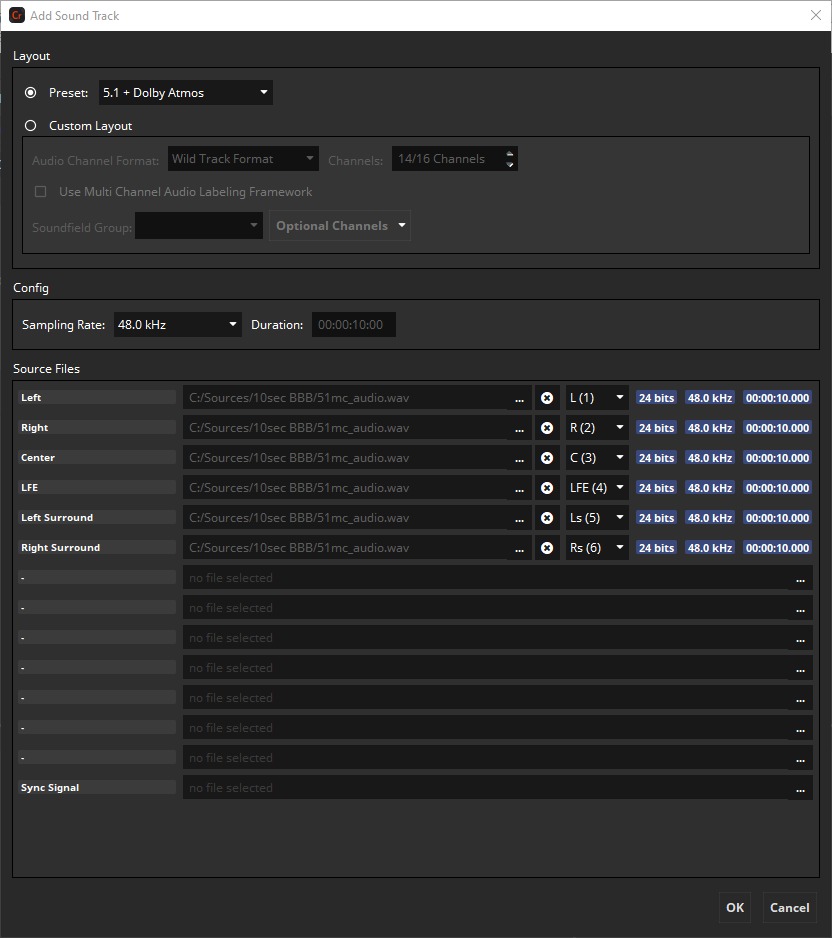
A 14 channel Sound Track will be added to the Track Manager. The synchronization signal will automatically be generated on channel 14.
Add Sign Language Track#
In case of RDD 52 the Sign Language Video Stream Audio Channel Label has to be explicitly set (see 5.2.2.1 Optional Channels (RDD 52).).
Brazilian Sing Language is wrapped in channel 15 of the corresponding sound track. To set it up in easyDCP Creator select the 16 Channels WTF preset from the “Add Sound Track” dialog and leave unused channels empty to mark them as silent, but put your sign language video In channel 15:
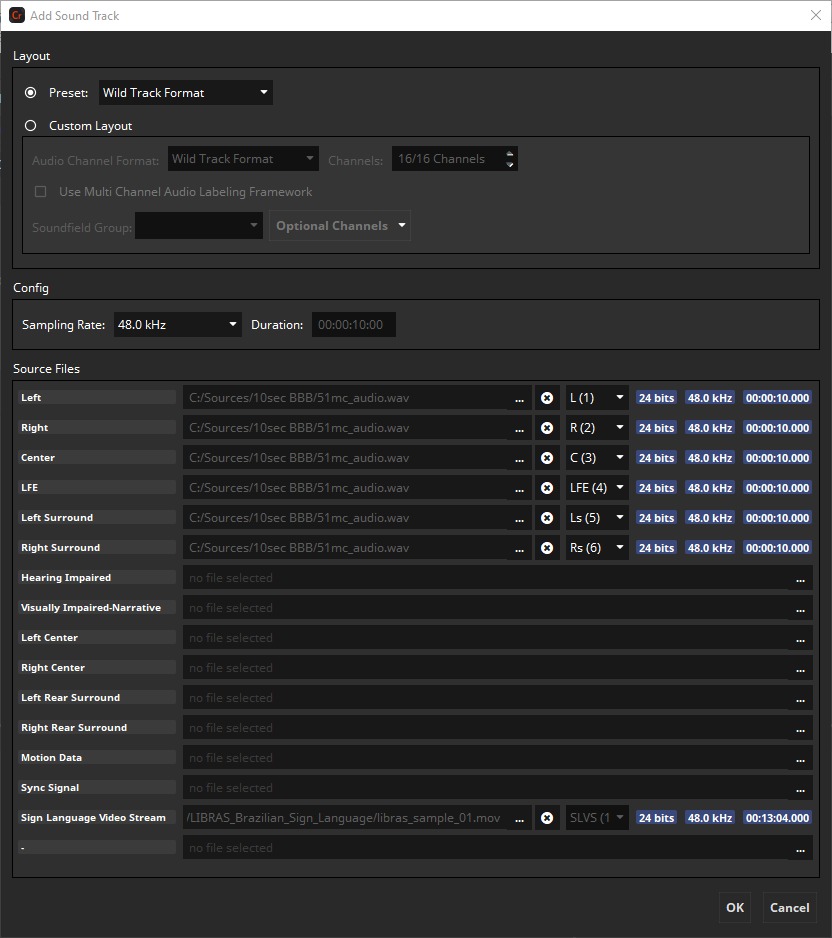
Supported input formats for sign language video are WAV and H264 encoded videos. The resolution has to be 480x640 with 24 fps.
For details check ISDCF Document 13.
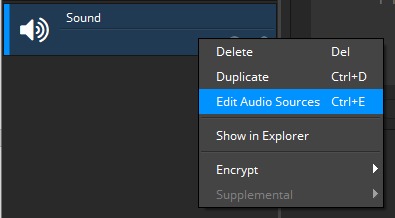
Edit Sound Track#
easyDCP Creator allows to edit the configuration of existing Sound Tracks added by the user or loaded from an existing DCP. Editing can be accessed by “Edit Audio Sources” from the Sound Track context menu.
This will open the Add Sountrack Dialog. OK to apply or Cancel to revert any changes.
The layout mode will be automatically set to Custom Layout if the Sound Track was loaded from a DCP or the Variant of the DCP was changed via the Project Configuration.
Supported Sound File Formats#
easyDCP Creator supports the following audio codecs and file formats:
Uncompressed PCM |
*.wav, *.wave, *.mov, *.mp4, *.mxf |
Advanced Audio Coding |
*.aac, *.mov, *.mp4 |
MPEG-1/2 Audio Layer III |
*.mp3, *.mov, *.mp4 |
Audio Interchange |
*.aiff, *.aif |
Broadcast Wave Format |
*.bwf |
Subtitle Tracks#
Add Subtitle Track#
To add timed text to the Track Manager, click the quick button “Subtitle” on the top of the Track list. The word “subtitle” is used here as a synonym for timed text.
Subtitle is only one example of timed text. The other example is Captions. Both subtitles and captions can be either Open or Close. This yields four combinations:
Open Subtitles
Closed Subtitles
Open Captions
Closed Captions
Open subtitles or captions will be displayed on the main screen and be visible to everyone in the audience, while Closed subtitles or captions are meant to be displayed on secondary screens available on demand.
Subtitles usually translate only the spoken words, while Captions are meant to aid deaf and hearing-impaired audiences and often also describe background sounds (“classical music is playing in the radio”).
While a DCP with InterOp conformity only supports Open Subtitles, a SMPTE DCP allows all four combinations.
Supported Subtilte File Formats#
Currently easyDCP Creator does not support converting between timed text formats.
When creating a DCP with InterOp conformity, the source is required to be in the Texas Instruments CineCanvas format, which is based on XML.
When creating a DCP with SMPTE conformity, the source is required to be in the SMPTE 428-7 D-Cinema Distribution Master – Subtitle format, which is also based on XML. Both formats are explained in more detail in the next two chapters.
Texas Instruments CineCanvas (InterOP)#
Interop compliant subtitles are based on the “Subtitle Specification for DLP Cinema™ Projection Technology” published by Texas Instruments. The default file extension is „.xml“. The XML root node is “DCSubtitle”.
An Interop compliant subtitle XML file should look like the following example:
<?xml version="1.0" encoding="UTF-8" ?>
 <DCSubtitle Version="1.0">
  <SubtitleID>97fd79ed-b2ff-468c-b11f-1a3792fc90dc</SubtitleID>
  <MovieTitle>Example Movie Title</MovieTitle>
  <ReelNumber>1</ReelNumber>
  <Language>English</Language>
  <!-- For testing this subtitle example, you need to copy a font file (e.g.
"arial.ttf") right next to this XML file. -->
  <LoadFont Id="arial" URI="arial.ttf" />
  <Font Id="arial" Color="FFFFFFFF" Effect="shadow" EffectColor="FF000000"
Size="42">
  <Subtitle SpotNumber="1" TimeIn="00:00:02:000" TimeOut="00:00:07:000"
FadeUpTime="2" FadeDownTime="2">
  <Text HAlign="center" VAlign="bottom" VPosition="10.00">Example Subtitle Text
One with LoadFont.</Text>
  </Subtitle>
  <Subtitle SpotNumber="2" TimeIn="00:00:08:000" TimeOut="00:00:12:000"
FadeUpTime="2" FadeDownTime="2">
  <Text HAlign="center" VAlign="bottom" VPosition="10.00">Example Subtitle Text
Two with Loadfont.</Text>
  </Subtitle>
 </Font>
</DCSubtitle>
<DCSubtitle Version=”1.0”>
The DCSubtitle tag indicates the root of the XML subtitle file. It includes the attribute version. The version is an optional attribute. If not specified, the projector will assume the latest version.
<SubtitleID>
The value of the SubtitleID tag is a hexadecimal Universally Unique Identifier (UUID). To generate a UUID there are several UUID generators available. easyDCP Creator will generate a new random UUID during packaging.
<MovieTitle>
The MovieTitle tag contains the name the title of the movie in which the subtitle shall be embedded.
<ReelNumber>
The value of the ReelNumber tag indicates the Reel that subtitle was generated for.
<Language>
The value of the Language tag indicates the subtitle language.
<LoadFont>
This field is optional. If present, easyDCP Creator will try to find the font file and packs it into the DCP. The font file must not be larger than 640kB.
<Subtitle SpotNumber=”1” TimeIn=”00:00:01:000” TimeOut=”00:00:05:000” FadeUpTime=”20” FadeDownTime=”20”>
The Subtitle tag indicates the beginning of a specific subtitle. The tag contains the following attributes and attribute-values:
SpotNumber
The SpotNumber identifies a particular subtitle location. The number is user definable.
TimeIn
The value of the TimeIn attribute indicates the first appearance of the subtitle. The formatting is HH:MM:SS:TTT (H=hours, M=minutes, S=seconds, T=ticks). The ticks can take the values 0-249, where one tick equals 4msec.
TimeOut
The value of the TimeOut attribute indicates the complete disappearance of the subtitle. The formatting is HH:MM:SS:TTT (H=hours, M=minutes, S=seconds, T=ticks). The ticks can take the values 0-249, where one tick equals 4msec.
FadeUpTime
The value of the FadeUpTime attribute defines the duration of the subtitle fade in. The formatting is TTT (T=ticks). The ticks can take the values 0-249, where one tick equals 4msec.
FadeDownTime
The value of the FadeDownTime attribute defines the duration of the subtitle fade out. The formatting is TTT (T=ticks). The ticks can take the values 0-249, where one tick equals 4msec.
<Text Direction=”horizontal” HAlign=”center” HPosition=”0” VAlign=”bottom” VPosition=”10.00”>
The value of the text tag is the actual subtitle text which appears on screen. The tag may contain the following attributes and attribute-values:
Direction
The value of this attribute indicates the direction of the rendered subtitle text. Valid values are horizontal and vertical. Default direction is horizontal.
HAlign
The value of this attribute indicates the horizontal alignment. Valid values are left, right and center. Default horizontal alignment is center.
HPosition
The value of the HPosition attribute indicates the horizontal position of the subtitle relative to the alignment value. The HPosition value is expressed as a percentage of the picture width from the edge or center according to the HAlign attribute. For example, HPosition=”9.5” in conjunction with HAlign=”left” implies that the text starts at a position 9.5% of the picture width from the left edge of the image. To center the text, choose HAlign=”center” and HPosition=”0”. Default horizontal position is 0.
VAlign
The value of this attribute indicates the vertical alignment. Valid values are top, bottom and center. Default vertical alignment is center.
VPosition
The value of the VPosition attribute indicates the vertical position of the subtitle relative to the alignment value. The VPosition value is expressed as a percentage of the picture height from the edge or center according to the VAlign attribute. For example, VPosition=”10” in conjunction with VAlign=”bottom” implies that the text starts at a vertical position 10% of the picture height from the lower edge of the image. The vertical position specified is the baseline on which the text is drawn. Default vertical position is 0.
SMPTE Subtitle#
SMPTE compliant subtitles are based on the specification “428-7 D-Cinema Distribution Master – Subtitle” published by the SMPTE for XML files or “429-5 D-Cinema Packaging – Timed Text Track” for mxf files. The xml is the raw format before packaging, while the mxf is the distribution format for unencrypted and encrypted subtitles.
A SMPTE compliant subtitle XML file should look like the following example:
<?xml version="1.0" encoding="UTF-8" ?>
<SubtitleReel xmlns="http://www.smpte-ra.org/schemas/428-7/2010/DCST">
 <Id>urn:uuid:94d3a710-b4b5-4b28-a020-eafb2f24c75d</Id>
 <ContentTitleText>Example Content Title</ContentTitleText>
 <AnnotationText>Example Annotation Text</AnnotationText>
 <IssueDate>2012-05-02T12:59:04+02:00</IssueDate>
 <ReelNumber>1</ReelNumber>
 <Language>en</Language>
 <EditRate>24 1</EditRate>
 <TimeCodeRate>24</TimeCodeRate>
 <StartTime>00:00:00:00</StartTime>
 <!-- For testing this subtitle example, you need to rename a font file (e.g.
"arial.ttf") to "5b0283b9-3c28-42a6-86ad-c22acb431665" and copy it right next to
this XML file. -->
 <LoadFont ID="Arial">urn:uuid:5b0283b9-3c28-42a6-86ad-c22acb431665</LoadFont>
 <SubtitleList>
  <Font ID="Arial" Color="FFFFFFFF" Weight="normal" Size="40">
   <Subtitle SpotNumber="1" TimeIn="00:00:02:00" TimeOut="00:00:07:00">
    <Text Valign="top" Vposition="10.00">Example Subtitle Text One with
LoadFont.</Text>
   </Subtitle>
   <Subtitle SpotNumber="2" TimeIn="00:00:08:00" TimeOut="00:00:12:00">
    <Text Valign="top" Vposition="30.00">Example Subtitle Text Two with
LoadFont.</Text>
   </Subtitle>
  </Font>
 </SubtitleList>
</SubtitleReel>
<Id>
The value of the tag “Id” is a hexadecimal Universally Unique Identifier (UUID). To generate a UUID there are several UUID generators available. easyDCP Creator will not generate a new random UUID during packaging.
<ReelNumber>
The ReelNumber tag denotes the ordered placement of this file in a set of DCDM Subtitle files. The value shall only be used for informative purposes and shall not influence the reproduction of the subtitle instances. The value is a positive integer in the range 1 .. n, where n is the total number of Reels in a Composition.
<LoadFont>
The LoadFont tag is used to declare an OpenType [ISO/IEC 14496, Part 18] font resource for use within the DCDM Subtitle file. The font is identified by a urn:uuid in the tag’s body. easyDCP Creator expects the entire external font filename to match the value of the urn:uuid (without any file extensions like „.ttf“ or „.otf“). The font file must be located in the same folder as the subtitle XML file. At least one LoadFont element shall be present.
Add Auxiliary Data (Dolby Atmos) Track#
To add a Dolby Atmos MXF file to the Track Manager, hit “Add Aux Data / Dolby Atmos Track”:
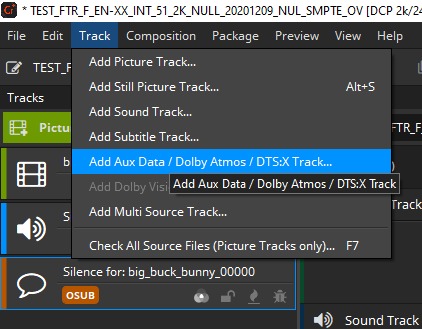
After choosing the Auxiliary Data MXF file, it will appear as a purple sound track in the Track Manager.
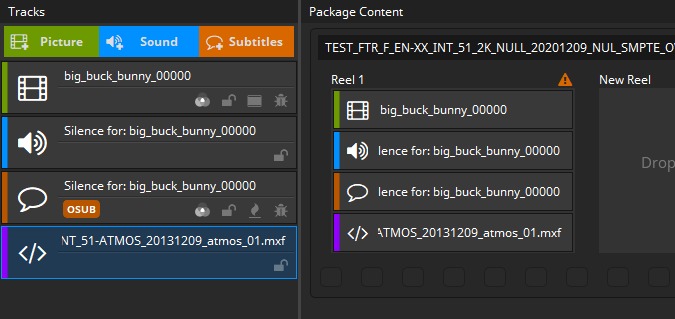
A Dolby Atmos track must be paired with a 14 channel Main Sound Track, containing a synchronization signal on channel 14. If a Dolby Atmos track is present in a reel, the synchronization signal will automatically be generated into channel 14 of the reel’s Main Sound Track.
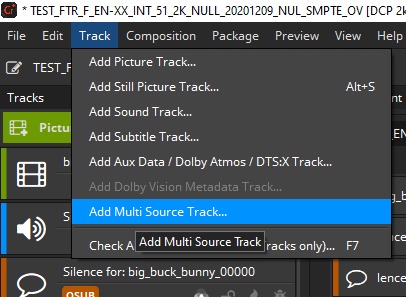
Add multi source track#
If you need to combine multiple separate files into one mxf you can use this option. The order of files determines the order they are shown, from top to down. Adding a file sequence the whole sequence counts not just the selected frame.
With the “+” und “-“ button you can add and remove files. With “Arrow up” and “Arrow down” buttons you can change the order.
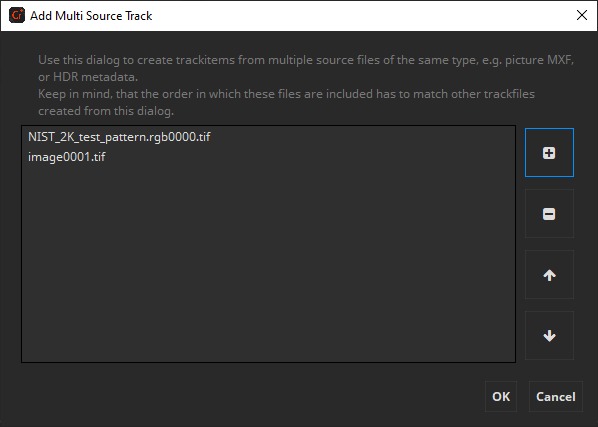
The formats and properties of the files have to match to be used together, e.g. same resolution and same file format.
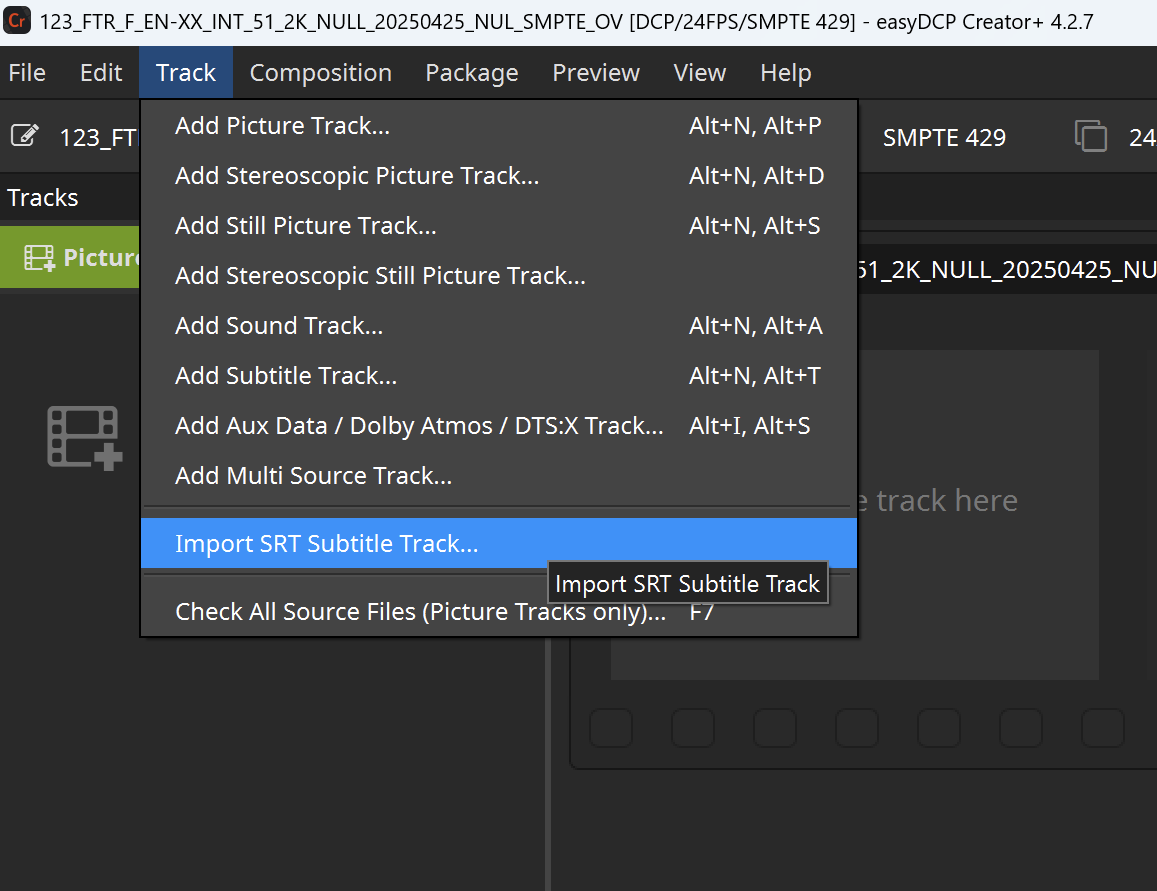
Import SRT Subtitle Track#
If your project requires the import of subtitles in the SRT (SubRip) format, easyDCP Creator+ provides you with a built-in conversion tool that will import them into your project.
Once inside the conversion tool, you can specify the following factors:
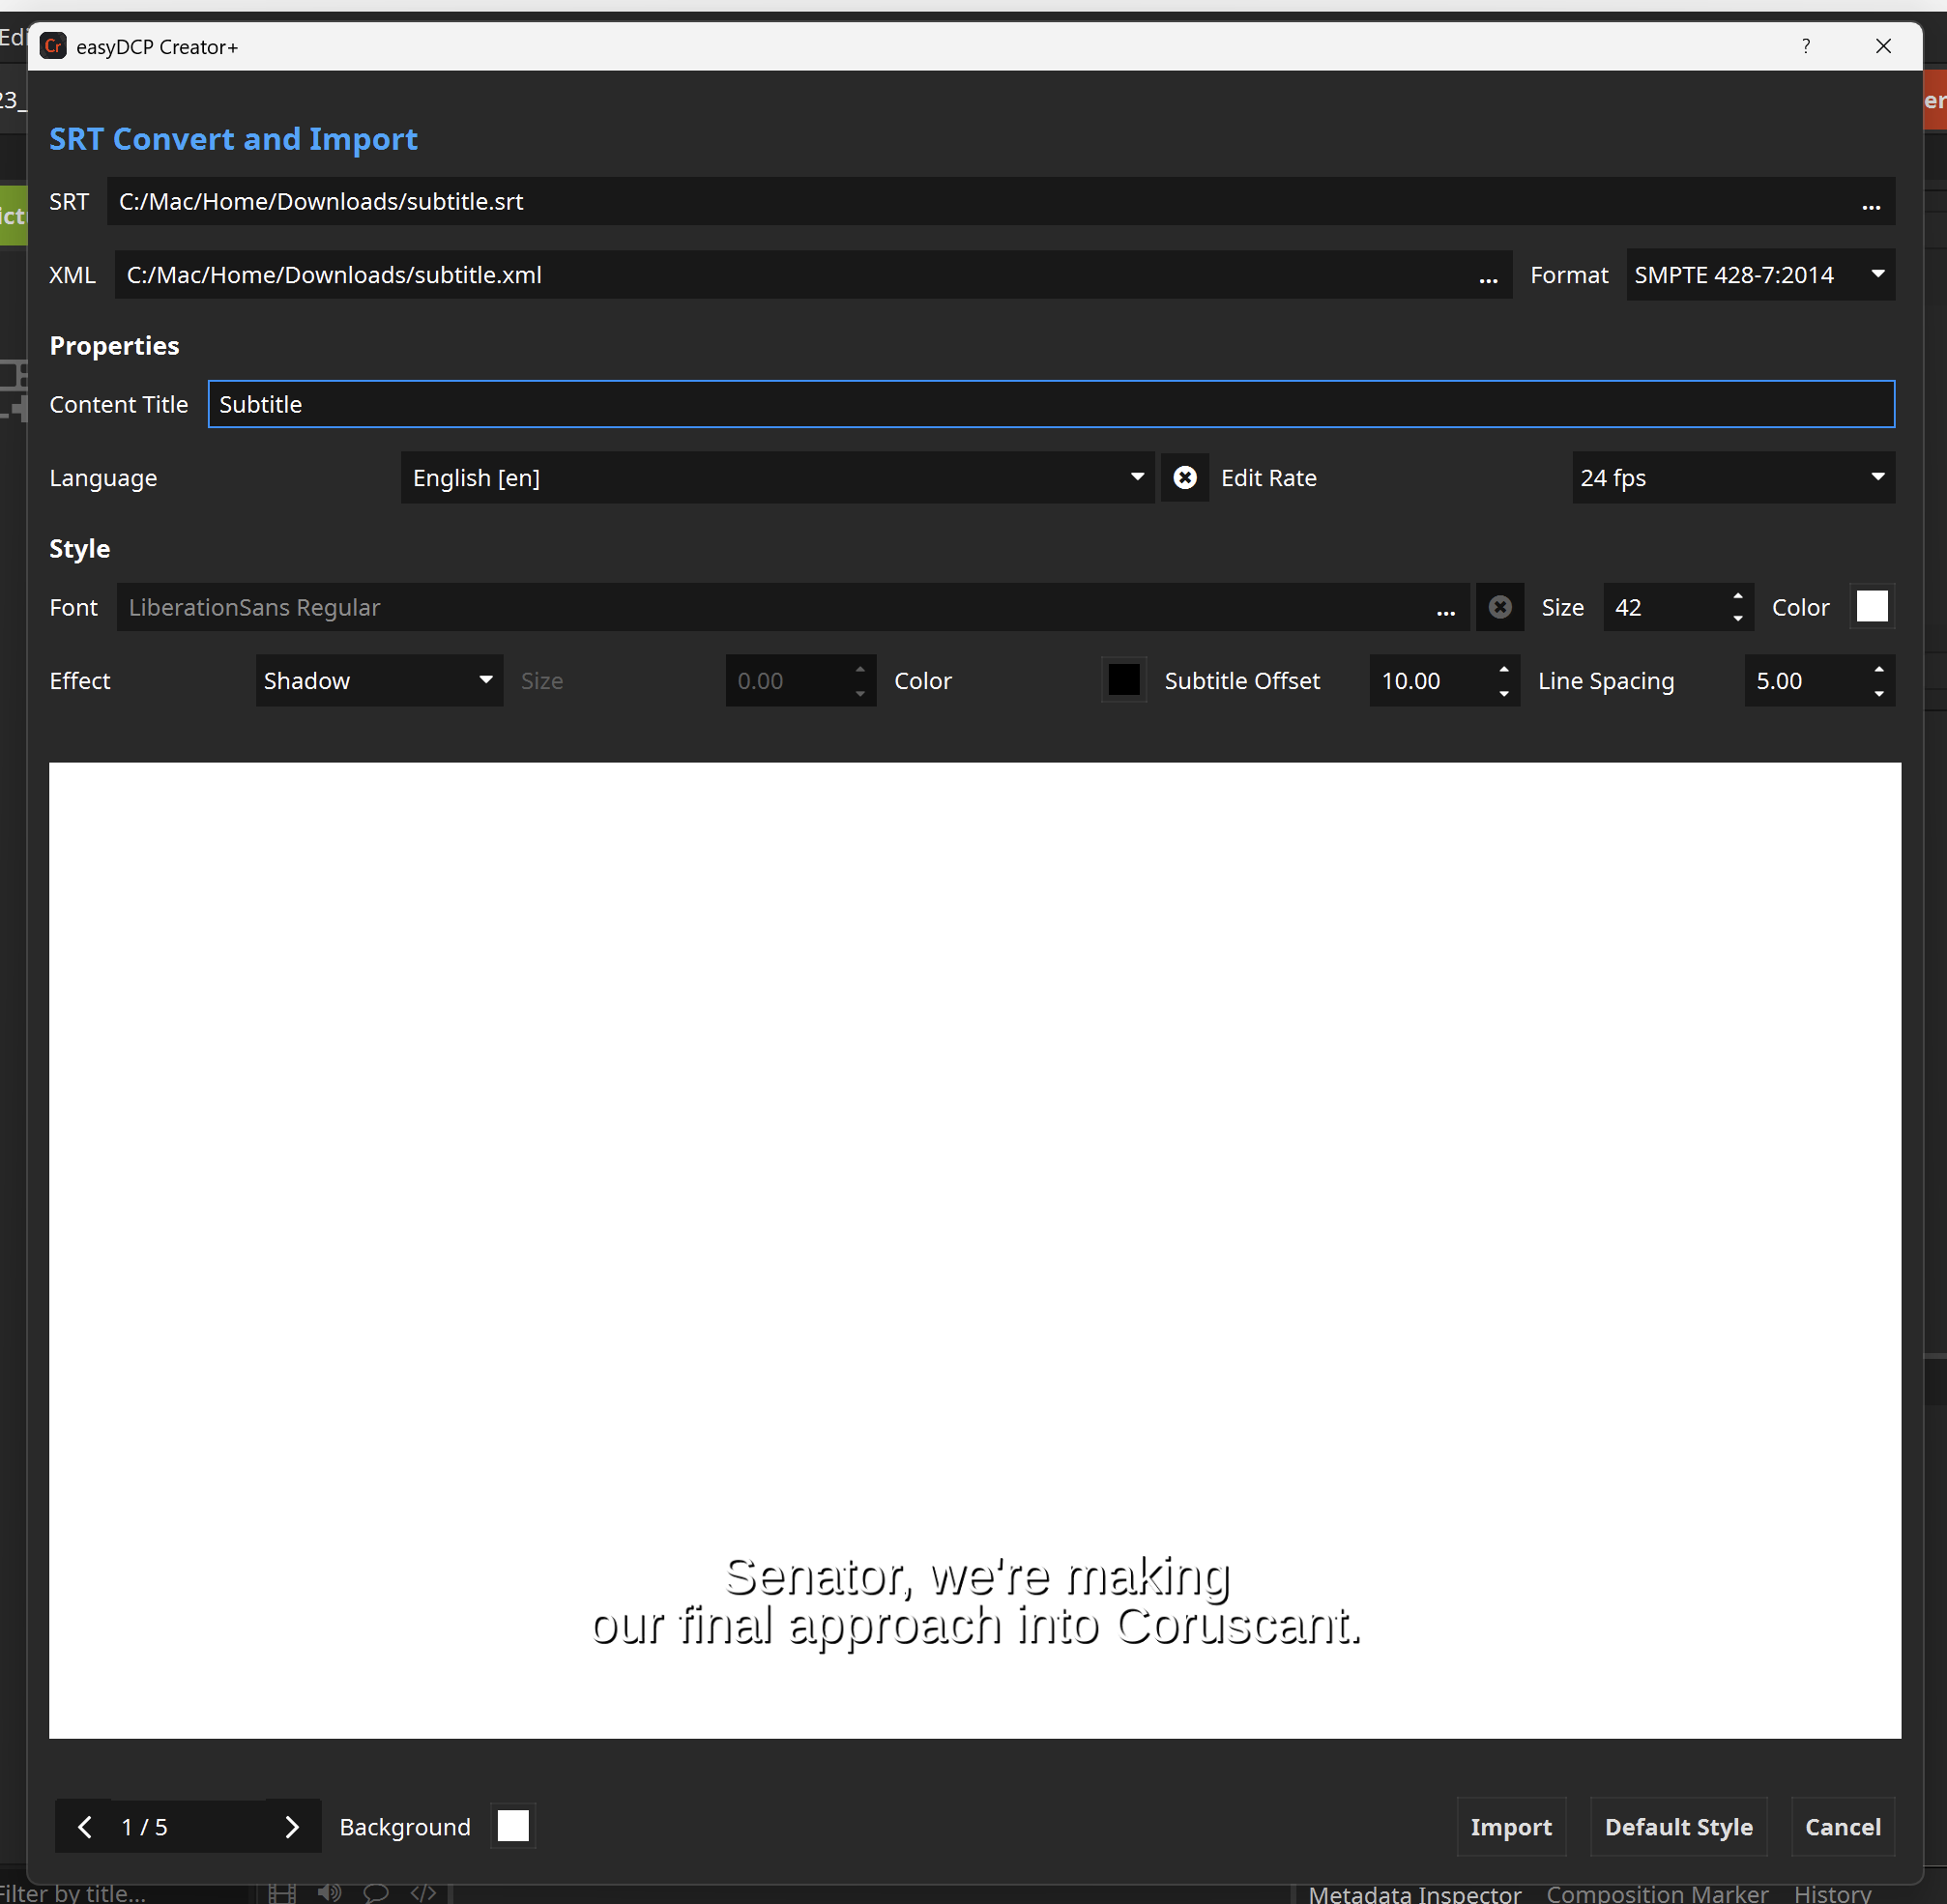
SRT: The path to your input SRT file.
XML: The path the generated subtitle XML and the required font resource will be stored at.
Format: The target subtitle format. This should match the format of your DCP and should be preselected for you. Typically this should be SMPTE 428-7 as DCSubtitle (InterOp) is legacy.
Content Title: The title of the generated subtitle.
Language: The language of the subtitle. Depending on the target subtitle format this must be an RFC 5646 conform string.
Edit Rate: This should match the edit rate of the DCP the subtitle is converted for (SMPTE 428-7:2014 only).
Font: Path to the Font-resource used for the generated subtitle. ‘LiberationSans Regular’ under SIL font license is provided as default if no other custom font file is selected. This default font may not include all posible characters and may not compatible with DCSubtitle (InterOp) font size limitation of 640 KiB. Custom fonts can either be OTF (OpenType Font) or TTF (TrueType Font) files and should not exceed 640 KiB for DCSubtitle and 10 MiB for SMPTE 428-7 subtitles.
Font Size: The font size on screen.
Color: The font main color.
Effect: The main subtitle effect. Shadow, Border or None.
Color: The effect coloring. This gives a color to your borders or shadows.
Subtitle Offset: Enabled/Disabled and the amount for the subtitle vertical offset.
Line Spacing: The spacing between the lines of subtitles.
It is important to further explain the correlation between the vertical offset and the spacing.
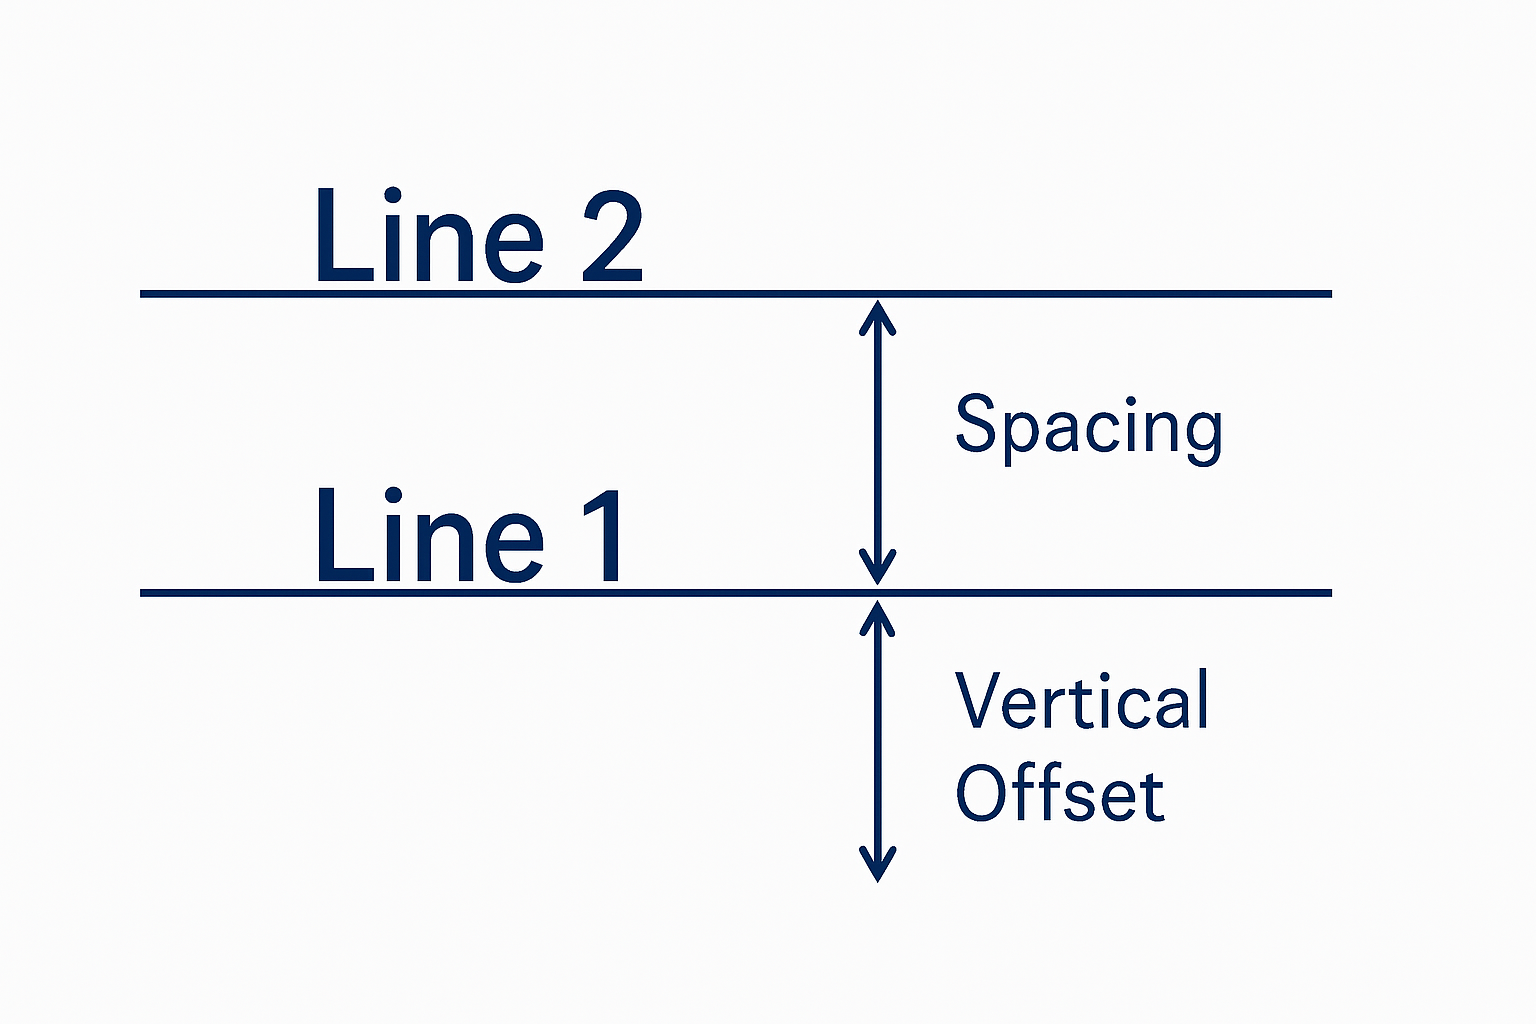
The vertical offset is given in percent from the bottom. The spacing is repeatedly adding the value to the absolute offset. Example: If the vertical offset is 10 and the spacing is 5, the absolute vertical offset from the bottom of the screen for lines is 10, 15 (10 + 5), 20 (10 + 2 * 5), and so on. The font size is not taken into account.
Once customized, the preview window gives an early peek at how your subtitles will show in the DCP. However, keep in mind, that the preview uses a fixed 2K resolution. Depending on Letterboxing, scaling, etc. this might look different in the final product. The preview can only indicate how the subtitle may look.
The Safe Area Tool#
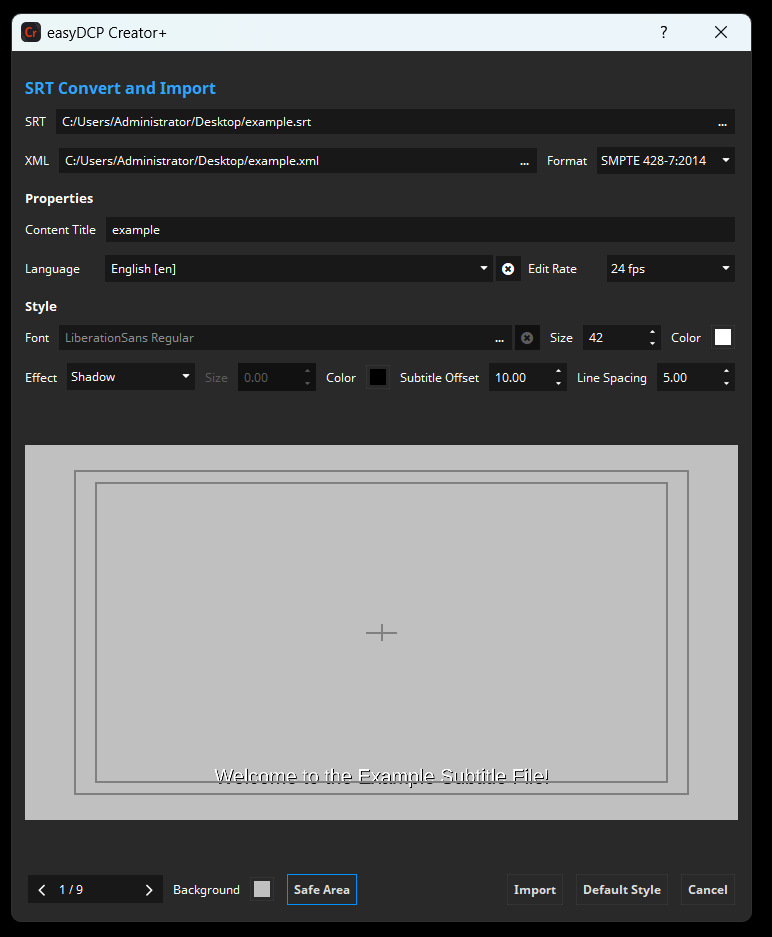
To further ease the process of subtitle fine-tuning, the “Safe Area” tool was created. Each option can be toggled on or off individually to visualize the recommendations for your DCP.
Action Safe: Here, all essential motion and graphics should be contained to ensure visibility across different displays.
Center: The center point of the canvas.
Title Safe: Here, text and subtitles should be positioned, to avoid them from being cropped across different displays.
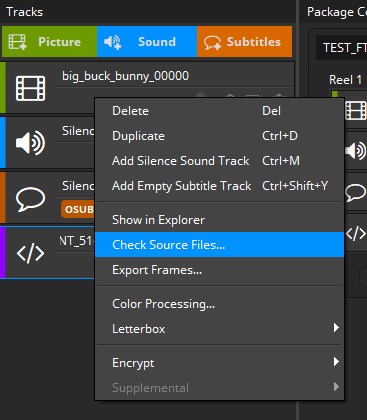
Check Source Files#
To check only the source files of a single Track, right-click on a Track and choose “Check Source Files…“:
The following dialog will appear:
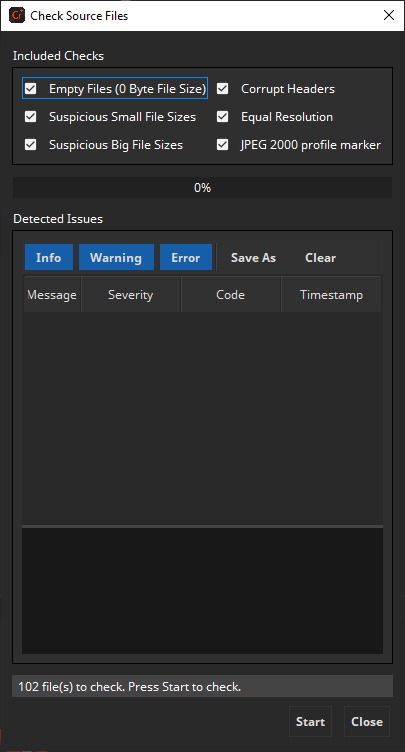
By default all checks are included (recommended). Checking for headers may slow down the checking progress, so if this will take too long you can disable this option.
Error Messages are displayed. If errors occurs during check, for example is a file is zero in size, read the warnings carefully and try to fix the problem. Then try again until no problems occur anymore.
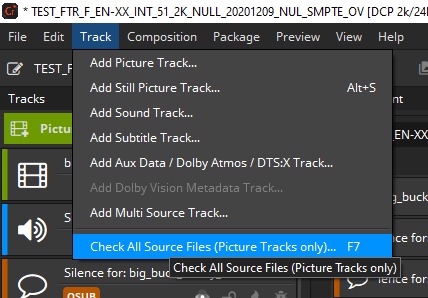
Check All Source Files#
To check all source files, choose the menu entry “Track -> Check All Source Files…“ or simply press F7 (see screenshot below).
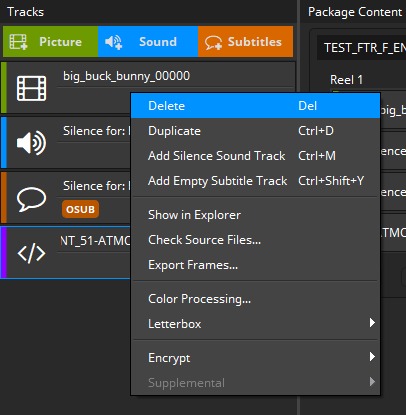
Remove / Delete Tracks#
To remove an item from the Track Manager, mark it and press the “Delete” key. Alternatively right-click the Track to open its context menu and select “Delete”. The Track will be removed from the list. This action will not physically delete any source files.
If the Track has already been added to one or more Reels, these references will be removed as well.